Automatically Schedule & Send Event Reminders
- Log in to Manager Portal.
- Navigate to Settings > Advanced Options (or use this direct link).
- Scroll down to the Automatically Schedule & Send Event Reminders section.
- Toggle the option ON (or OFF if you wish to disable it) and adjust the timing (the default is 1 day before the event).
- Click Save at the top of the page to apply your changes.
Ensure Email Reminders Are Enabled for a Specific Event
- Log in to your Manager Portal and select Events from the top rail.
- Choose your event and click on Attendee Communication in the left rail.
- Verify that the Send Automatic Event Reminders to Attendees option is checked.
- Note: This uses your system-wide reminder email template.
- To update the content of these reminders:
- Navigate to Settings > Confirmation & E-tickets > View/Modify Email Templates.
- Select the Event Reminder template from the dropdown.
- Make your changes and click Save.
Setting Up Post-Event Emails
Scheduling Automated Post-Event Emails
SimpleTix offers an automated post-event email feature that sends a message to your attendees after your event has concluded.1
Access Your Event
Click on the event for which you want to schedule a post-event email from your events dashboard.
2
Navigate to Attendee Communication
Click on Attendee Communication in the left-hand navigation rail.
3
Access Post-Event Email
Click on the Actions button, then select Post-Event Email from the dropdown menu.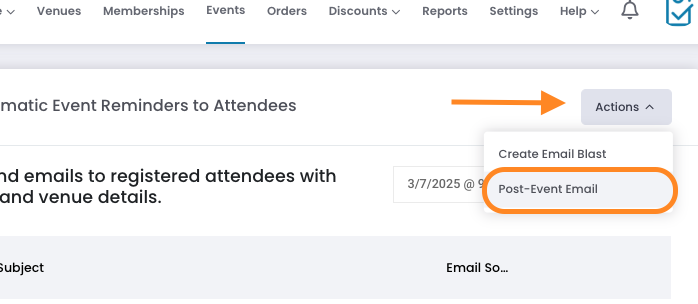
4
Configure Email Settings
Enter a subject line for your email and specify when after the event you want it to send (e.g., 1 day, 3 days, 1 week).
5
Compose Your Message
Enter your email message in the editor. This is a great opportunity to thank attendees, request feedback, or promote upcoming events.
6
Link to Future Events (Optional)
You can include links to future events you’re hosting to encourage repeat attendance.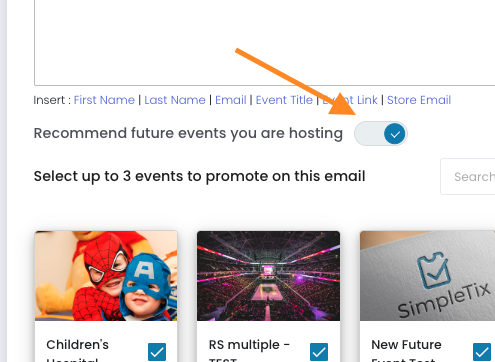
7
Save and Schedule
Click Save to queue this email to send automatically on your specified schedule after the event concludes.
Using the Post-Event Email Template
- SimpleTix includes a pre-designed Post-Event Follow Up template.
- To modify this template:
- Go to Settings > Confirmation & E-tickets > View/Modify Email Templates.
- Select the Post-Event Follow Up template.
- Changes here will automatically update future follow-ups.
- Ensure that during event creation, you enable the option for automatic post-event follow-up (if available in your event settings dropdown) so that attendees receive the follow-up without manual intervention.
Post-Event Surveys
To include a survey in your post-event email:- Create your survey using your preferred tool (SurveyMonkey, Google Forms, etc.)
- Copy the survey link
- Include the link in your post-event email message
- Add clear instructions for attendees to complete the survey
Managing Email Reminders for Multi-Day or Recurring Events
- Reminders are tied to the specific event time.
- For multi-day or recurring events, consider creating individual event times for each session if different communications are needed.
- Alternatively, use the More Options in the Attendee Communication area to target specific dates and times.
- This approach avoids sending multiple or conflicting reminders and ensures each session receives the correct communication.
Handling Zoom Link Details for Multi-Session Events
- For events involving multiple sessions or Zoom links, ensure that the correct link is sent to attendees.
- Use custom fields or include the Zoom link directly in the event description so that the correct session details are included in the email templates.
- If a Zoom link needs to be updated post-scheduling, resend the event communication using a manual email blast through the event’s Attendee Communication section.
Contact Event Organizer Email – Clarification
- The Contact Event Organizer email is managed within Settings > Store.
- This email not only goes to the site owner but can also be customized according to your needs at the store level.
- When customizing, ensure that changes are saved correctly and note that this setting applies site-wide.
Accessing Email Template Editor
Learn how to customize your reminder email templates.
Abandoned Cart Recovery Emails
SimpleTix automatically sends recovery emails to customers who abandon checkout.