
Find the right report: Use the table below to pick a report, then follow its steps in the sections that come after.
Which Report Should I Use?
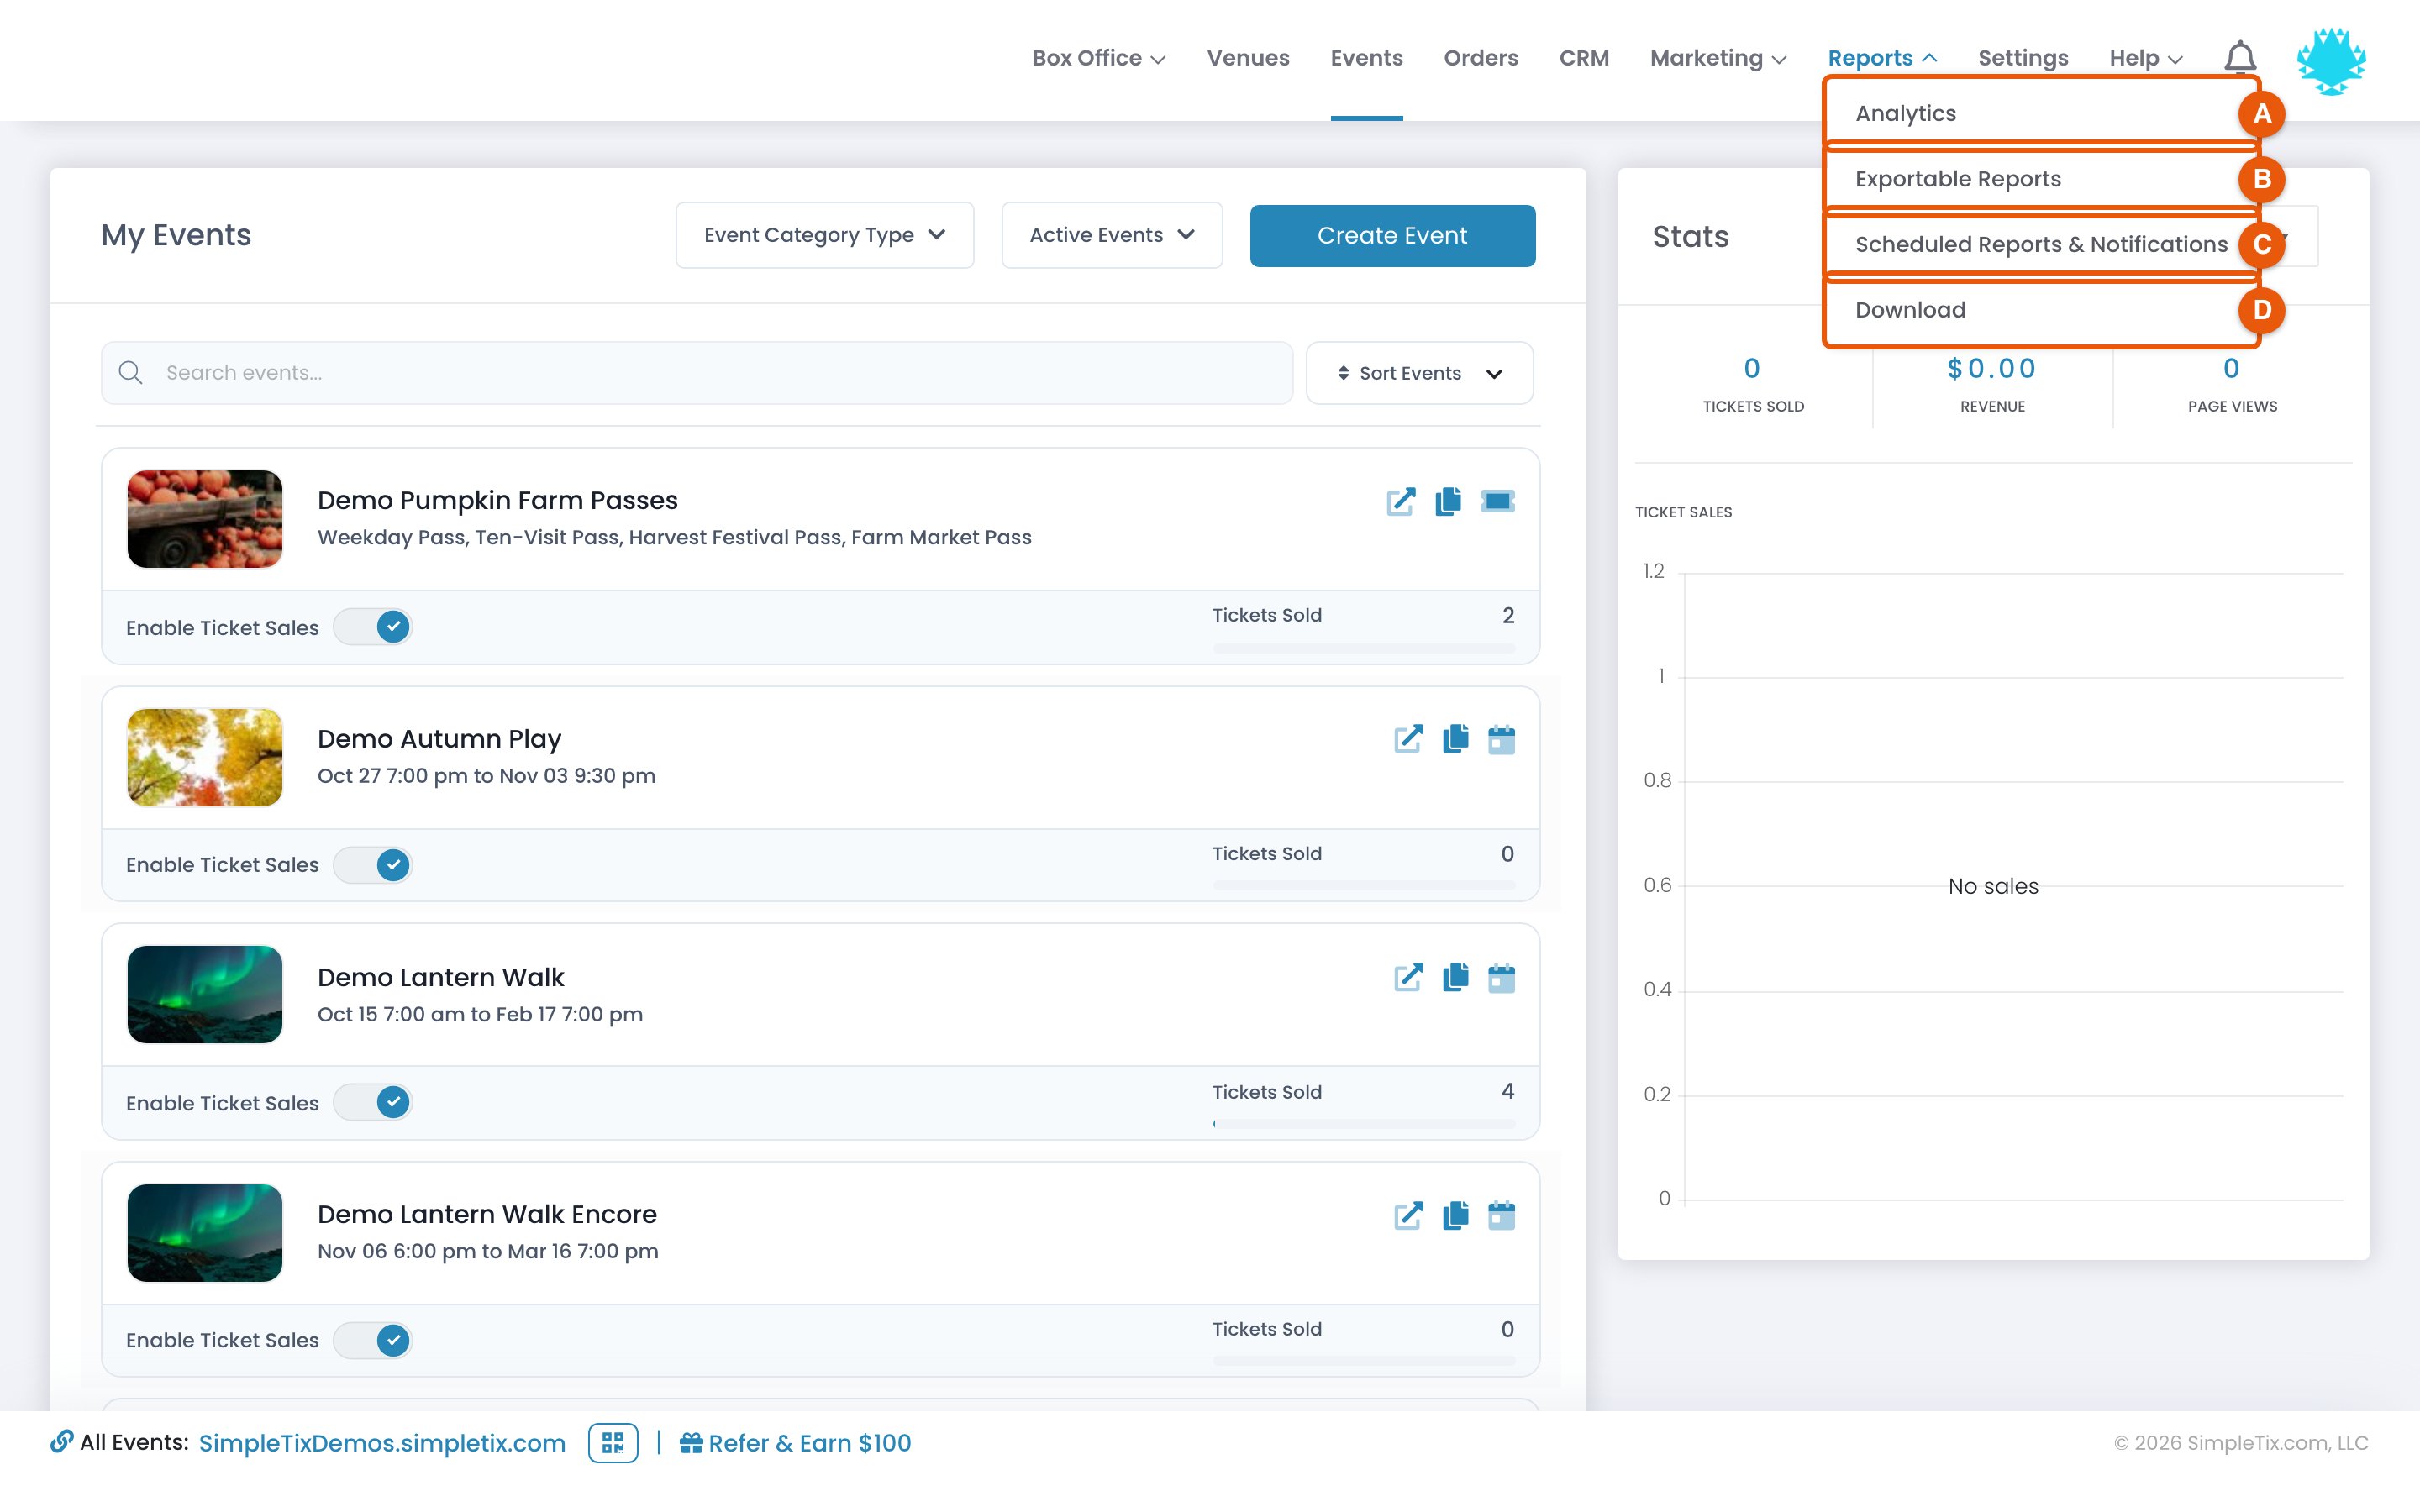
SimpleTix Reporting Options
Here are the ways to get to your event data:Analytics
- Access by clicking Reports on the top rail, then selecting Analytics
- Interactive reporting dashboard that provides real-time insights directly in the browser
- Filter and analyze data across all events or dive deep into specific event metrics
- Includes visual representations of key metrics like sales, attendance, and ticket scan rates
- View detailed Square item sales and donation analytics
- Export specific data tables to CSV or copy to clipboard
Analytics Center Guide
Learn how to use the new interactive Analytics Center to gain real-time insights into your event performance.
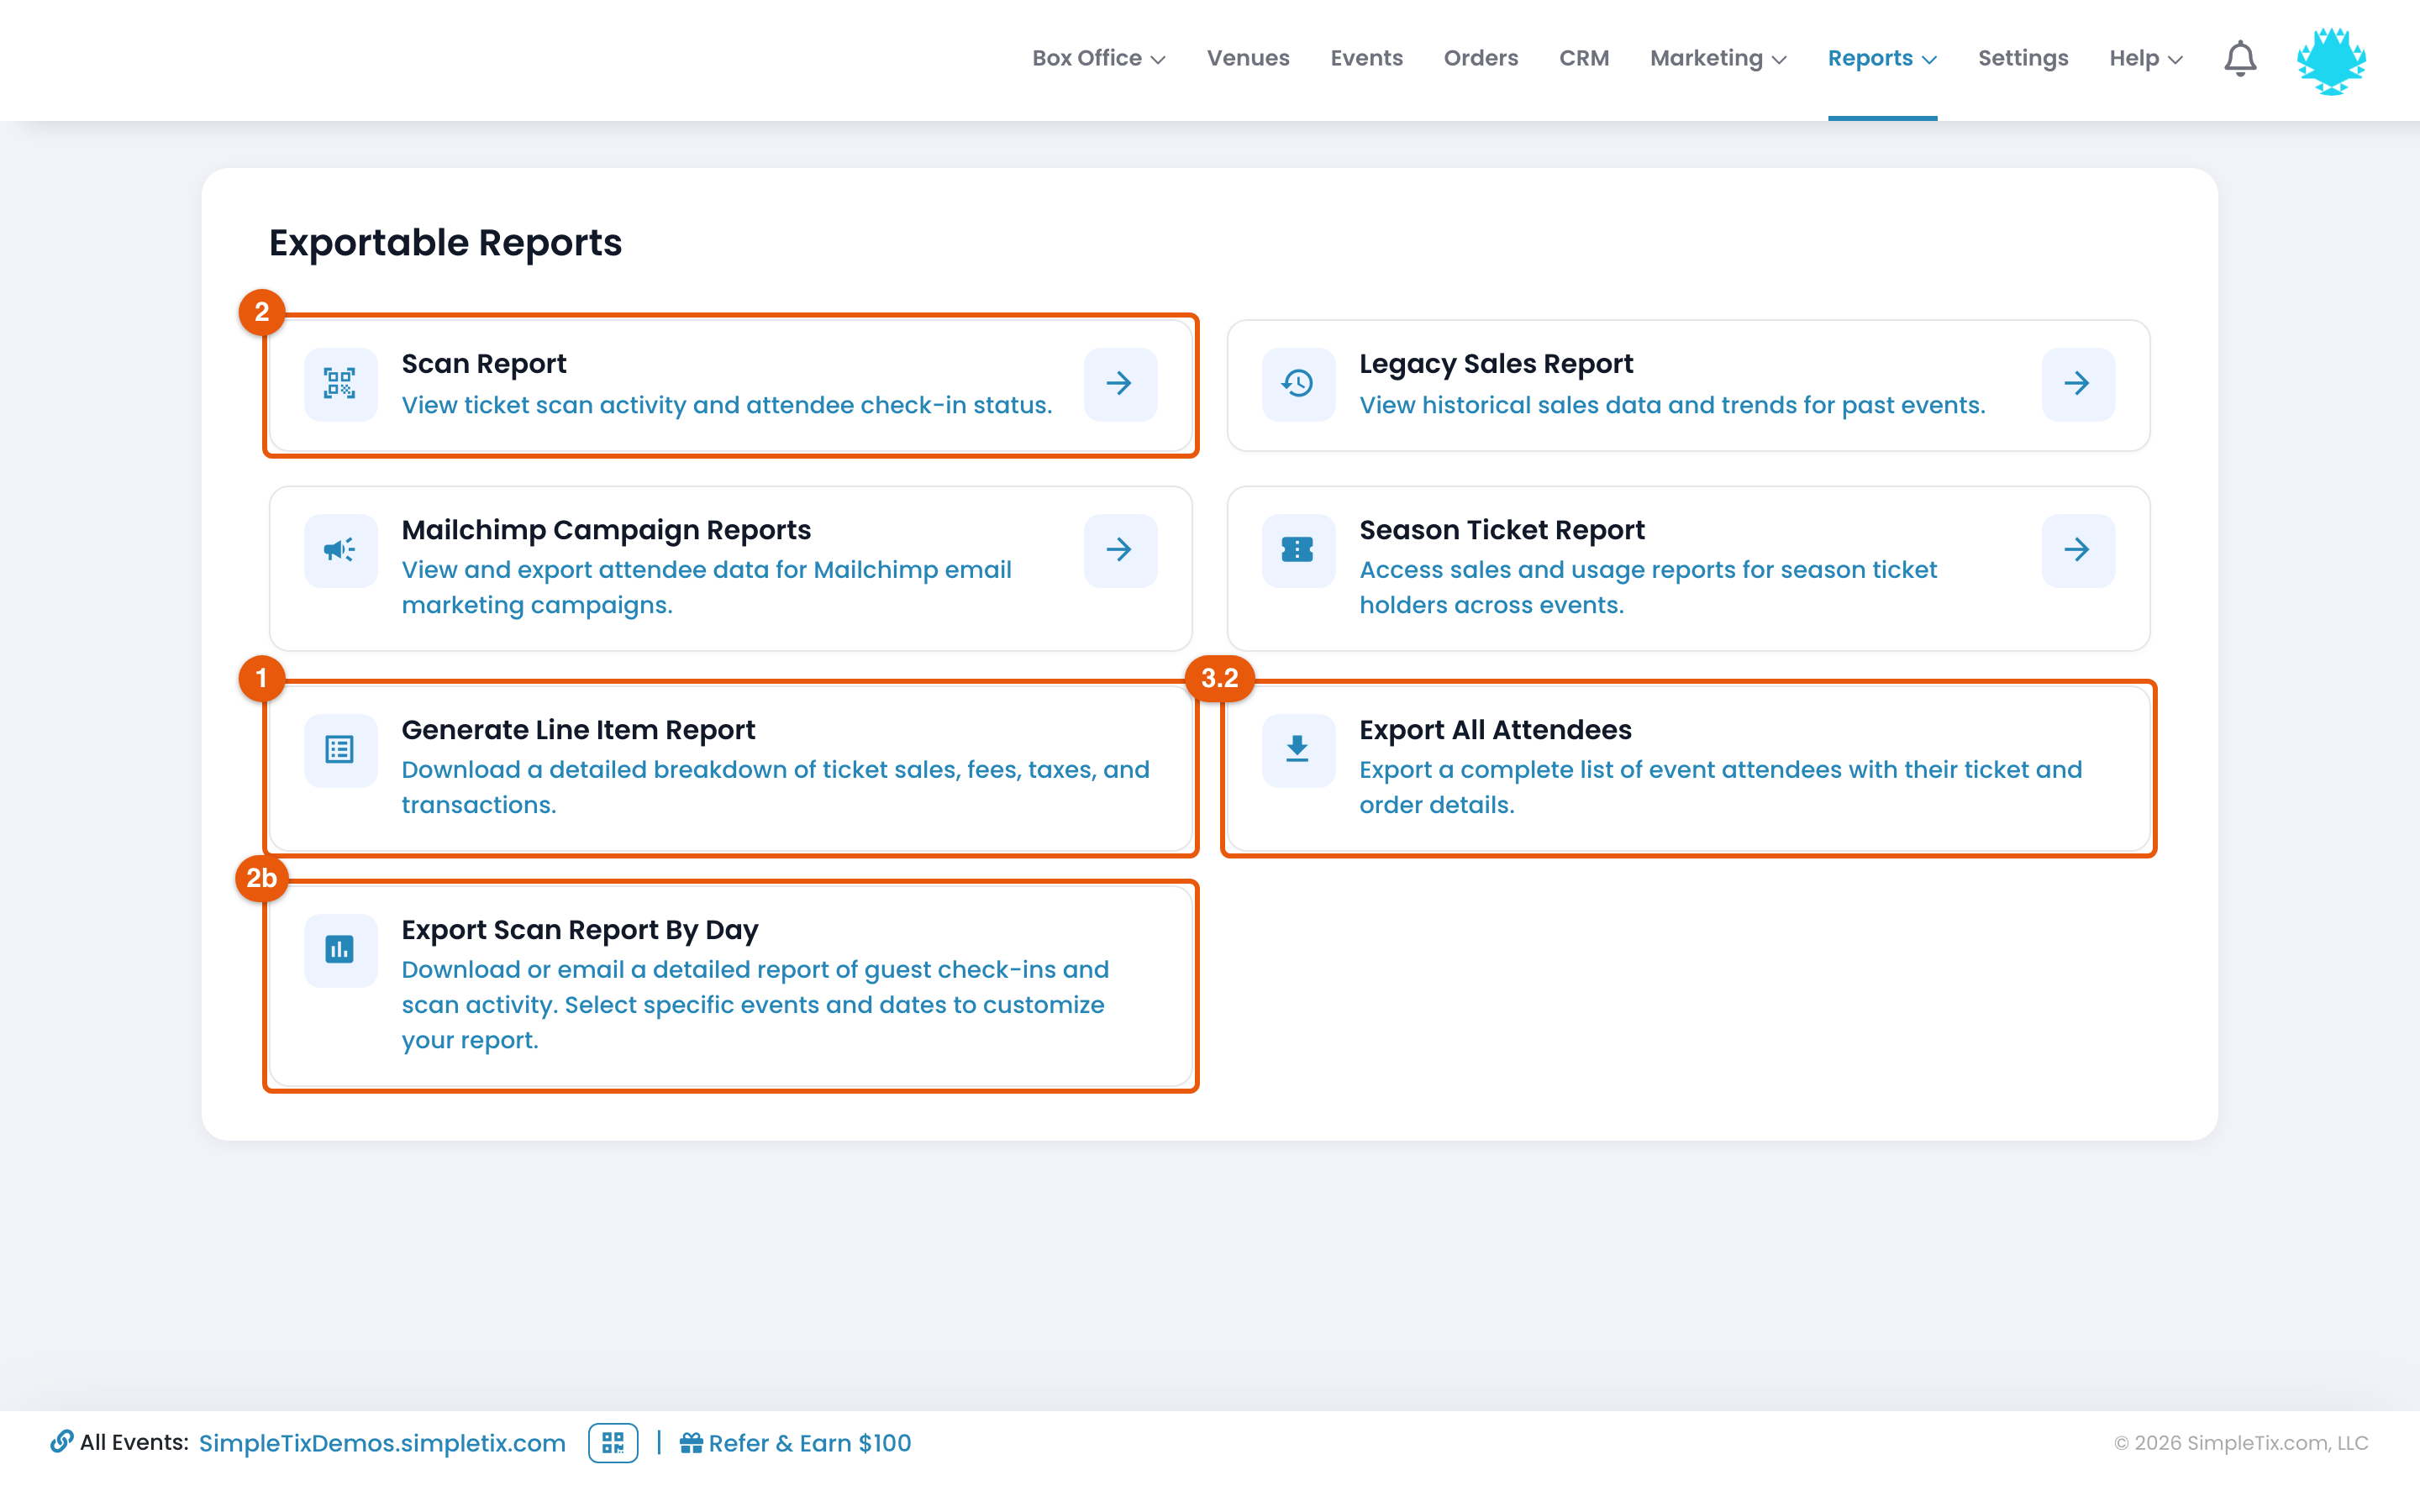
Exportable Reports
- Access by clicking Reports on the top rail, then selecting Exportable Reports
- Generate detailed reports that are sent to your email or made available under Reports → Download
- Includes line-item sales reports, ticket scan reports, attendee lists, and more
- Best for detailed data exports and offline analysis
- The sections below explain each export option
Scheduled Reports & Notifications (Account-Level)
The Scheduled Reports & Notifications page provides centralized control over automated reports and emails that SimpleTix sends.
Accessing Scheduled Reports & Notifications
- Log in to your Manager Portal at https://manager.simpletix.com
- Click Reports on the top rail
- Select Scheduled Reports & Notifications from the menu
Overview
The Scheduled Reports & Notifications page is an account-level dashboard that allows you to:- Turn the reports and organizer notifications listed on this page on or off. Enable All and Disable All apply to the selected tab.
- Manage automated report delivery for your entire account
- Get two new daily report types that are available only here
New Daily Report Types
The Scheduled Reports & Notifications page offers two new daily report types that are only available here:1. Register Report (Daily)
A daily summary of all sales activity, broken down by the device used to process each sale. What It Includes:- Total sales for the day
- Sales breakdown by device (for example, Box Office computer, scanner app, web checkout)
- Transaction details organized by point of sale
- Helpful for tracking which devices or staff members are processing the most transactions
- Monitor daily sales performance across multiple devices
- Track box office vs. online sales
- Audit sales by device for accountability
- Identify which sales channels are most active
2. Product Redemption Report (Daily)
A daily report of all product redemptions (merchandise, concessions, upsells), also organized by device. What It Includes:- All product redemptions for the day
- Breakdown by device used to process the redemption
- Product details and quantities
- Useful for inventory management and tracking which devices are processing product sales
- Monitor daily merchandise and concession sales
- Track inventory depletion by location/device
- Ensure all product redemptions are being properly recorded
- Analyze which sales channels are moving the most products
Managing Automated Reports
From the Scheduled Reports & Notifications page, you can:- Toggle automated reports on or off
- Set delivery schedules for daily reports
- Manage recipient email addresses for automated reports
- Control which reports are active across your entire account
- Manage your notification preferences for event-related alerts
The Scheduled Reports & Notifications page controls account-level automated reports. For event-specific scheduled reports, see section 11. Scheduled Reports (Event Level) below.
1. Generating a Line‐Item Sales Report
Step-by-Step Instructions
- Log in to your Manager Portal at https://manager.simpletix.com.
- Navigate to the Reports section:
- Click Reports on the top rail, then select Exportable Reports from the dropdown.
- Or go directly to this URL.
- On the Exportable Reports page, click Generate Line Item Report.
- Choose a time frame, then choose Send via Email (enter your email address) or Download.
- The report is an Excel file.
Tracking sales by staff member or affiliate
For in-person sales made with Shared Accounts, have each staff member use their own Subuser Access Code. The order export includes a Worker Name column when shared accounts are enabled. Orders without an attributed subuser can have a blank worker name. For sales referred through promotional links, use Affiliate Reports. Affiliate attribution and the staff member who processed an order are different ways of tracking sales.Tips & Troubleshooting
- For event-specific reports, use the available filters in the dashboard or in your Excel report.
2. Exporting a Ticket Scan Report
Step-by-Step Instructions
- Log in to your account and:
- Click Reports on the top rail, select Exportable Reports, then Scan Report.
- Or visit directly via this URL.
- Select the Export Scan Report option.
- This report includes detailed information on which tickets were scanned during your event.
Tips & Troubleshooting
- If data appears incomplete, verify that your event date and time range filters are set correctly.
- Still missing data? Contact SimpleTix Support and we’ll take a look.
2b. Export Scan Report By Day
This report shows your ticket scans for each day, plus the revenue for those tickets.Step-by-Step Instructions
- Log in to your account, click Reports on the top rail, then select Exportable Reports from the dropdown.
- Select Export Scan Report By Day.
- The report will include:
- A count of scans per day
- The associated revenue for the scanned tickets
Read the Scan Totals
- Reserved Seating scan revenue belongs to the scanned ticket’s category.
- For a multi-use Flex Pass, scanned revenue allocates the ticket value across its allowed uses. For example, a $100 five-use pass scanned twice contributes $40 of allocated scanned revenue.
- Scanned revenue is an allocation of ticket value, not new money collected on the scan date. Use sales and payment reports when reconciling cash receipts.
Use Cases
- Venues like farms and multi-day attractions that want to see attendance and revenue broken down by day
- Comparing daily attendance patterns across a season
- Reconciling daily revenue with scan counts
3. Exporting Attendee Data
3.1 Exporting All Attendees for an Event
Step-by-Step Instructions
- Log in to your account and click Events from the top rail.
- On the event page, click Attendee List.
- In the top right of the Attendee Management page, click Options then select Export List.
- Set Include survey question to Yes to include the answers buyers gave at checkout.
- Enter the email address to receive the file, then click Send, or download it from Reports → Download.
Tips & Troubleshooting
- Exports for large events might take a few minutes to process.
- Refer to our guide on Managing and Filtering Attendee Lists if you have difficulty locating specific details.
3.2 Exporting All Attendees (Across All Events)
Step-by-Step Instructions
- Log in to your account, click Reports on the top rail, then select Exportable Reports from the dropdown.
- Navigate to the Exportable Reports page or go directly to this URL.
- Click the Export All Attendees button.
- Wait for the file to generate, then open Reports → Download to retrieve it.
What’s Included
- Basic attendee information across all events
- Marketing consent status for each attendee, so you can see who has opted in or out of marketing communications
Tips & Troubleshooting
- This report may take longer to generate than single-event exports, especially for accounts with many events.
4. Summary Scan and Sales report
See a high-level summary of ticket sales and ticket scans.Step-by-Step Instructions
- Log in to your account, click Reports from the top rail, then select Exportable Reports from the dropdown.
- Select Scan Report
- Search by Event Name, time frame, and event status
5. Refund Report
See all refunds for an event.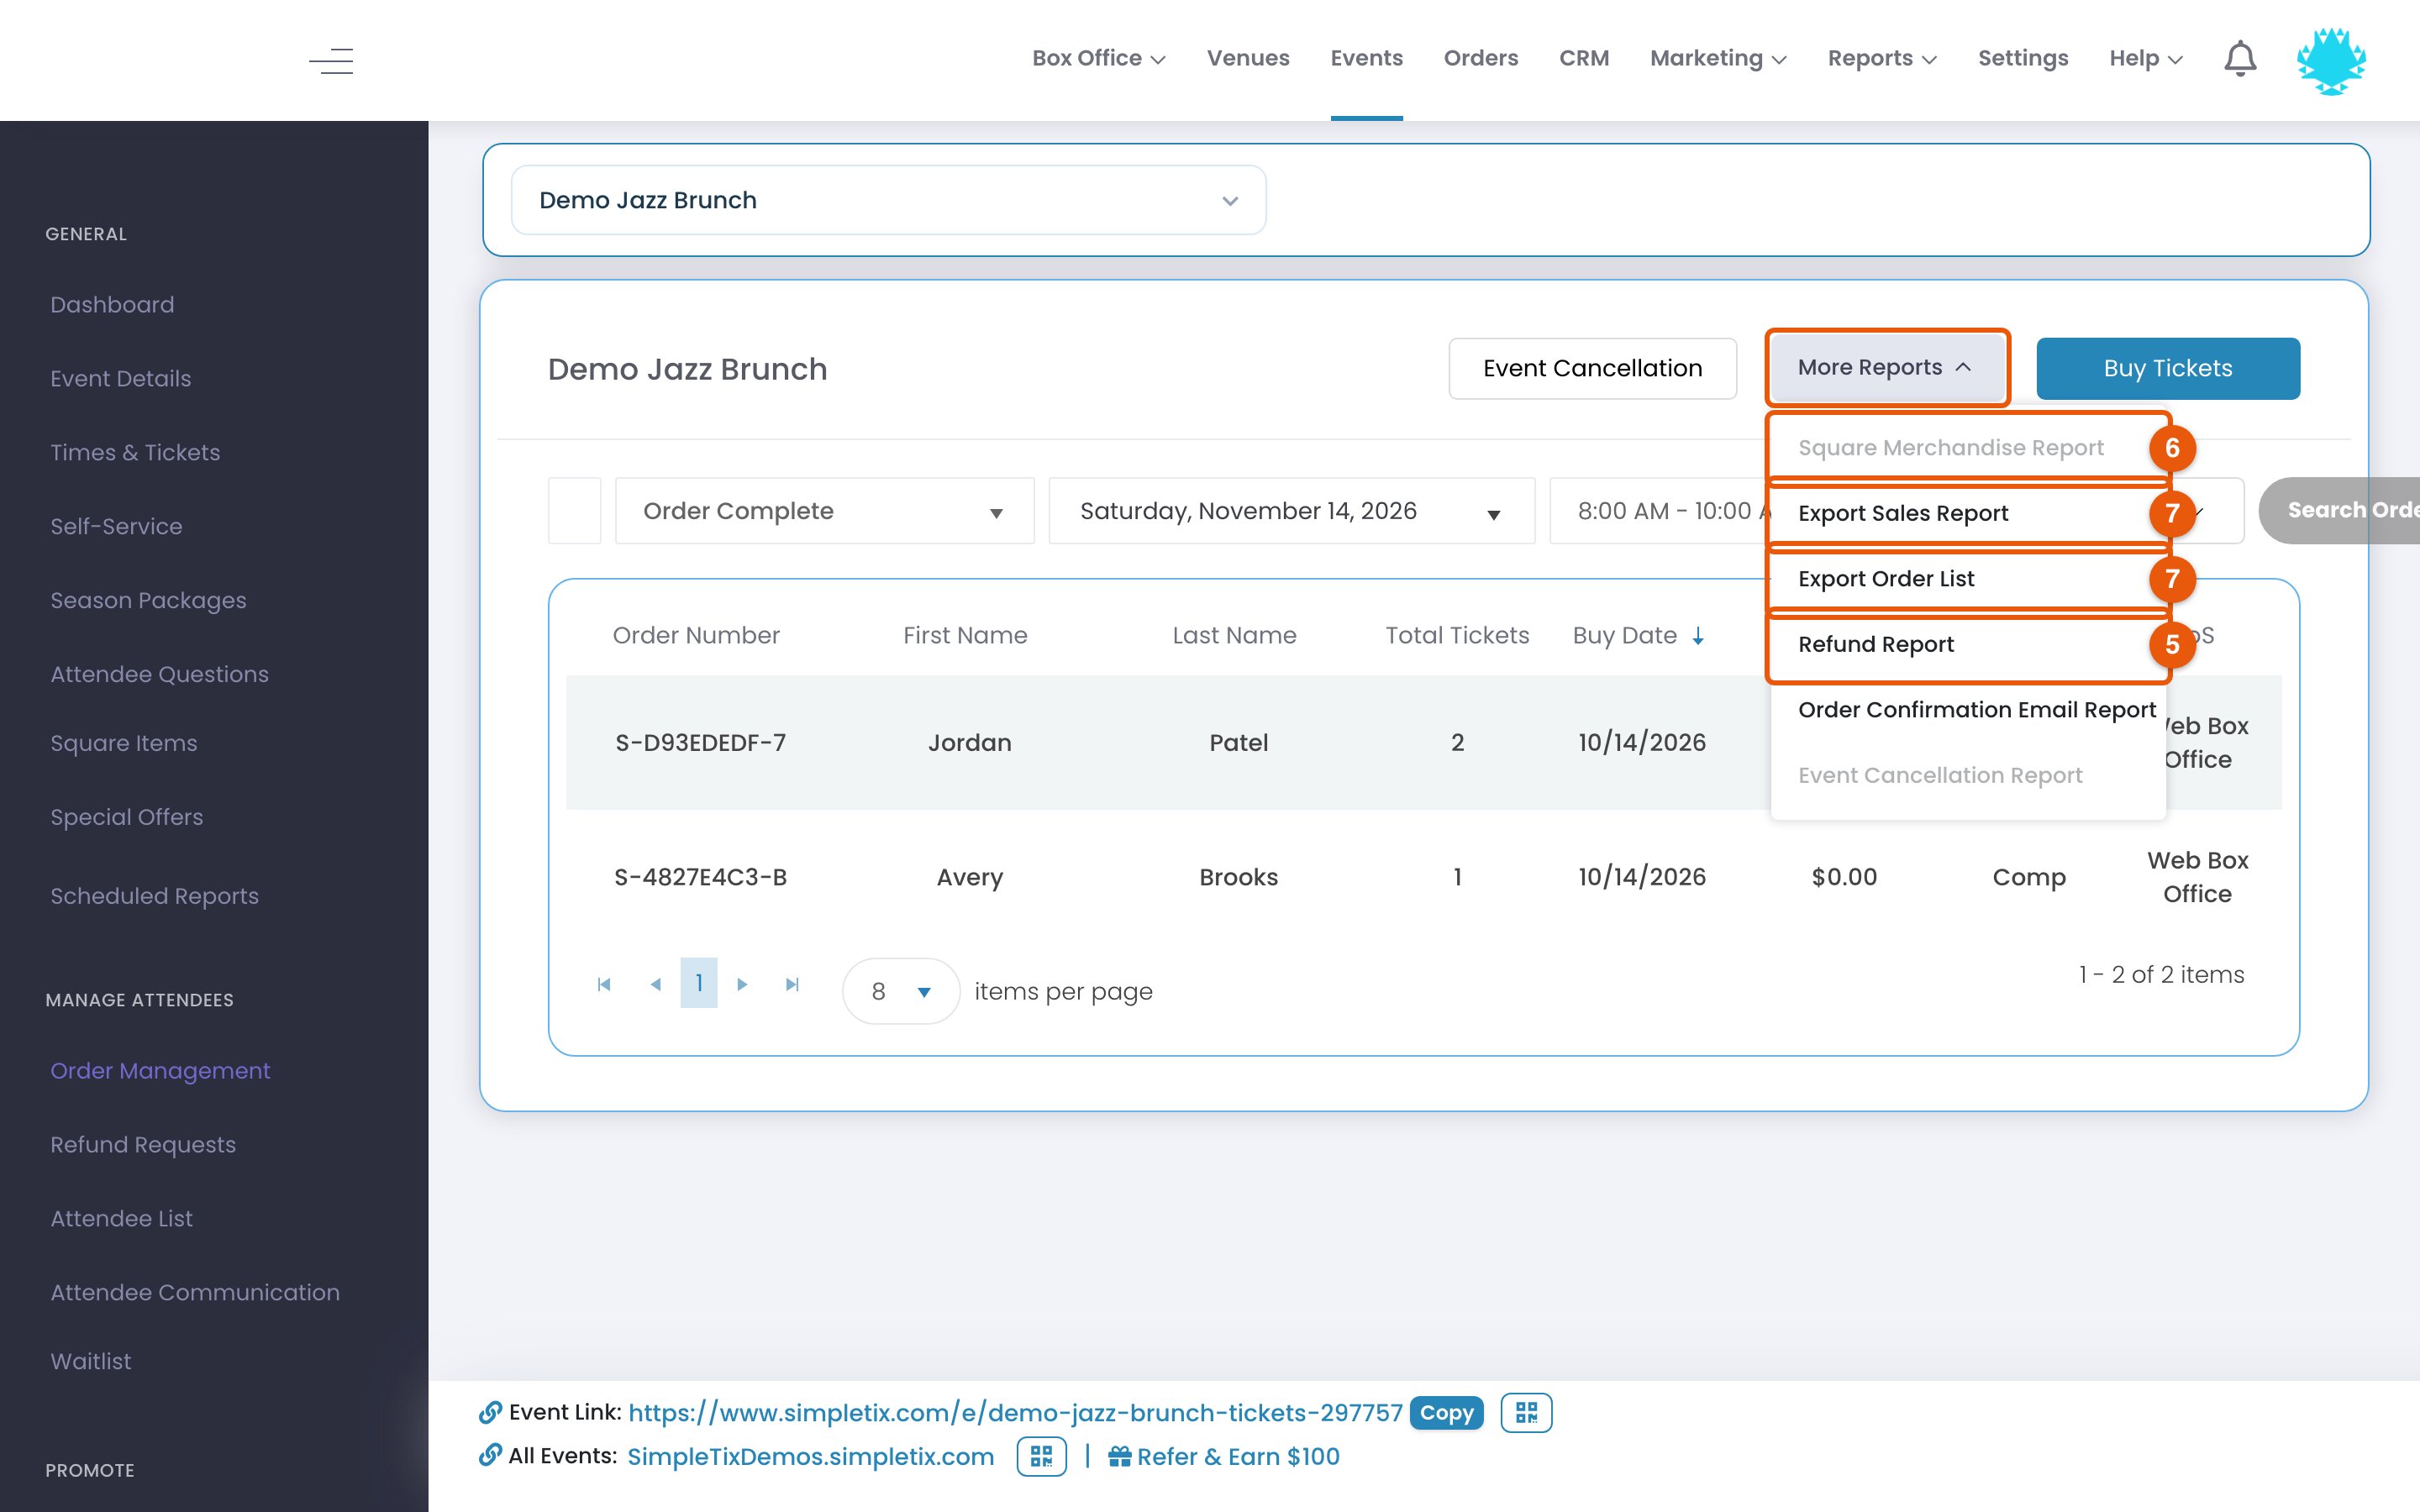
Step-by-Step Instructions
- Log in to your account and click Events from the top rail.
- On the event page, click Order Management, select More Reports, and select Refund Report
Reading the Refunded Order List
The Refunded Order List shows refunded orders and the total refunded for each order. For a particular order, compare the report with Transaction Details. For a bulk refund, use Bulk Refund Reports to inspect the batch’s refunded, skipped, and failed orders.6. Square Merchandise (upsell report)
See all the Square items you have sold and their redemption status.Step-by-Step Instructions
- Log in to your account and click Events from the top rail.
- On the event page, click Order Management, select More Reports, and select Square Merchandise Report
7. Event Level Order Report
See all orders for an event.Step-by-Step Instructions
- Log in to your account and click Events from the top rail.
- On the event page, click Order Management, select More Reports, and select Export Order List to get a list of orders or Export Sales Report to get a list of all tickets sold
Reading Ticket Quantities
TotalTickets in an Order List export counts active tickets, including free and complimentary tickets.8. Event Level Attendee Report
See all attendees for an event, along with their answers to attendee questions.Step-by-Step Instructions
- Log in to your account and click Events from the top rail.
- Click your event
- On the left hand rail, click Attendee List, select Options, and select Export List to get a list of Attendees with their attendee questions.
9. Donation report
Export a donation report for your event to see exactly who is funding your mission.Step-by-Step Instructions
- Log in to your account and click Events from the top rail.
- Click your event
- Click Order Management on the left hand rail
- Click More Reports and select Donations Report
- Choose the event time you want to export donations for. To export several event times at once, turn on Enable Multiple Time selection.
- Click Export Donations Report to export the report
10. Affiliate Reports
SimpleTix offers specialized reports for tracking affiliate performance, helping you manage partner relationships and calculate commissions.Step-by-Step Instructions
Summary Affiliate Report (All Affiliates)
- Log in to your account and click Marketing from the top rail.
- Select Affiliate from the dropdown menu.
- On the Affiliate Marketing Center page, click the Download Report button at the top.
- This generates a spreadsheet with summary statistics for all your affiliates (similar to the data shown in the main table).
Detailed Affiliate Report (Single Affiliate)
- Navigate to the Affiliate Marketing Center as described above.
- Find the specific affiliate you want to analyze.
- Click the Download Icon (down arrow) next to that affiliate’s name.
- This report includes a detailed breakdown of all orders attributed to this specific affiliate.
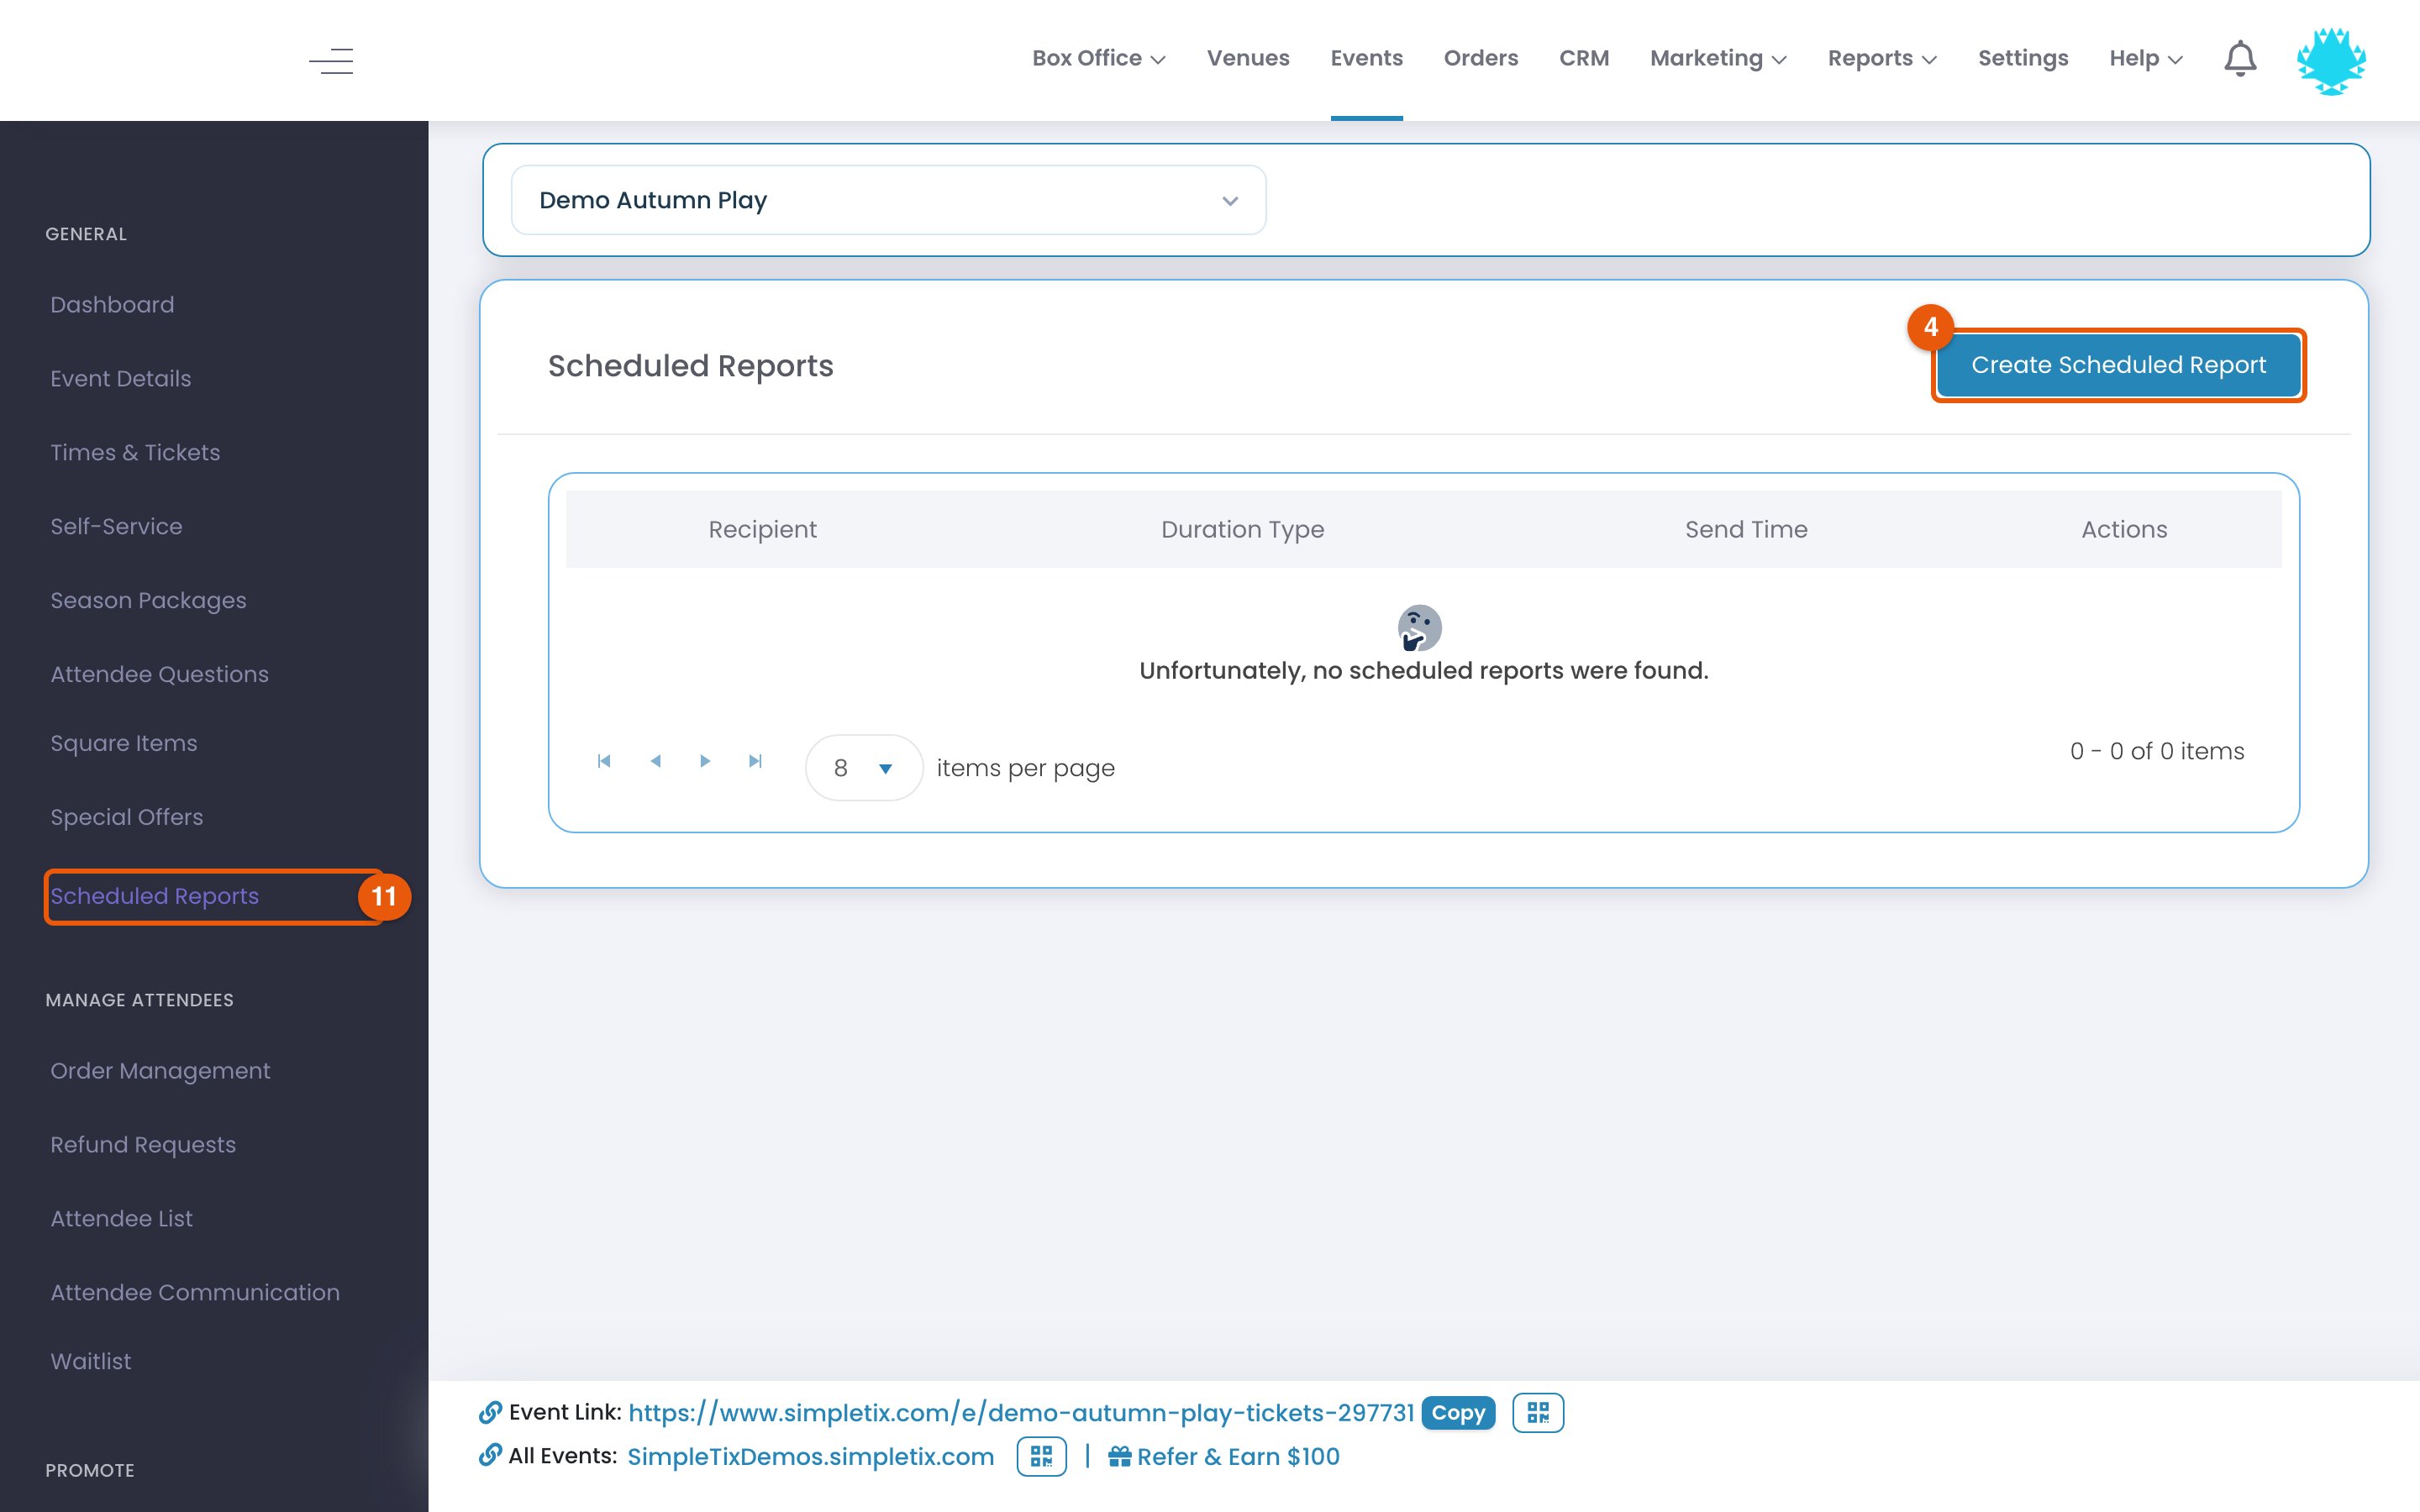
11. Scheduled Reports (Event Level)
Set up scheduled reports for an event to get its ticket sales and revenue in your inbox daily, weekly or as a one-time event total.Step-by-Step Instructions
- Log in to your account and click Events from the top rail.
- Click the event you want to set up scheduled reports for.
- On the left-hand rail, click Scheduled Reports.
- Click Create Scheduled Report, then choose your desired reporting frequency:
- Yesterday: A daily report covering the previous day
- Last 7 Days: A weekly report covering the past 7 days. Pick the day it’s sent under Select a day.
- Total For Event: A one-time report with the event’s full totals
- Under Select Time, choose what time the report is sent.
- Enter the Recipient Email.
- Click Create to activate your scheduled report.
What’s Included in Scheduled Reports
Each scheduled report includes:- Total number of tickets sold for the reporting period
- Total revenue generated for the reporting period
- Breakdown by ticket type (if applicable)
Reading Daily and Weekly Sales Summaries
The event breakdown in a daily or weekly sales summary counts tickets from orders placed during the reporting period, not events taking place during that period. It lists ticket quantities and ticket-price revenue separately. Free tickets and tickets discounted to $0 can contribute to the ticket count without adding ticket-price revenue. For a General Admission event, the breakdown groups these quantities and amounts by ticket type. To check a line, open the event’s Order Management page and use More Reports → Export Sales Report. Compare the order dates with the email’s reporting period.Reading Card Totals
Daily and weekly sales emails include Square Apple Pay and Google Pay orders in their credit-card counts and totals. These wallet payments also contribute to the Box Office Credit Card Total. When comparing Box Office totals, Order Total represents base ticket sales, while Credit Card Total includes fees collected with card payments. The two totals can therefore differ. If a discrepancy remains, contact SimpleTix Support with the event, exact date range, and the name of the report or email you are comparing.SimpleTix Conversion Tracking Guide
Additional insights on conversion tracking to complement your sales reporting.
Affiliate Marketing Center Guide
Learn more about setting up and managing your affiliate program.