Automatically Schedule & Send Event Reminders
- Log in to Manager Portal.
- Navigate to Settings > Advanced Options (or use this direct link).
- Scroll down to the Automatically Schedule & Send Event Reminders section.
- Toggle the option ON (or OFF if you wish to disable it) and adjust the timing (the default is 1 day before the event).
- Click Save at the top of the page to apply your changes.
Ensure Email Reminders Are Enabled for a Specific Event
- Log in to your Manager Portal and select Events from the top rail.
- Choose your event and click on Attendee Communication in the left rail.
- Verify that the Send Automatic Event Reminders to Attendees option is checked.
- Note: This uses your system-wide reminder email template.
- To update the content of these reminders:
- Navigate to Settings > Confirmation & E-tickets > View/Modify Email Templates.
- Select the Event Reminder template from the dropdown.
- Make your changes and click Save.
Setting Up Post-Event Emails
Scheduling Automated Post-Event Emails
SimpleTix offers an automated post-event email feature that sends a message to your attendees after your event has concluded.Access Your Event
Click on the event for which you want to schedule a post-event email from your events dashboard.
Navigate to Attendee Communication
Click on Attendee Communication in the left-hand navigation rail.
Access Post-Event Email
Click on the Actions button, then select Post-Event Email from the dropdown menu.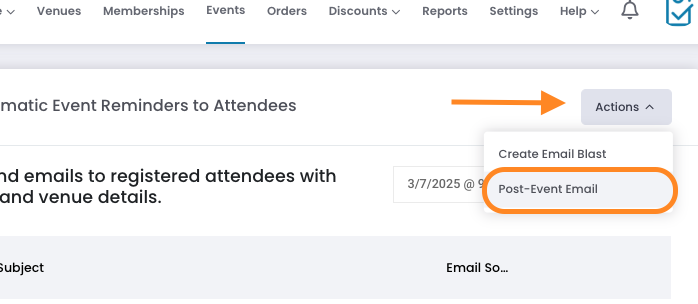
Configure Email Settings
Enter a subject line for your email and specify when after the event you want it to send (e.g., 1 day, 3 days, 1 week).
Compose Your Message
Enter your email message in the editor. This is a great opportunity to thank attendees, request feedback, or promote upcoming events.
Link to Future Events (Optional)
You can include links to future events you’re hosting to encourage repeat attendance.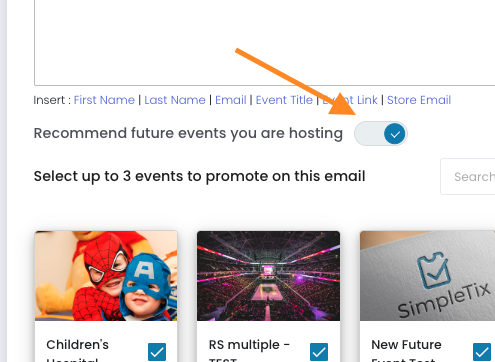
Using the Post-Event Email Template
- SimpleTix includes a pre-designed Post-Event Follow Up template.
- To modify this template:
- Go to Settings > Confirmation & E-tickets > View/Modify Email Templates.
- Select the Post-Event Follow Up template.
- Changes here will automatically update future follow-ups.
- Ensure that during event creation, you enable the option for automatic post-event follow-up (if available in your event settings dropdown) so that attendees receive the follow-up without manual intervention.
Post-Event Surveys
To include a survey in your post-event email:- Create your survey using your preferred tool (SurveyMonkey, Google Forms, etc.)
- Copy the survey link
- Include the link in your post-event email message
- Add clear instructions for attendees to complete the survey
Managing Email Reminders for Multi-Day or Recurring Events
- Reminders are tied to the specific event time.
- For multi-day or recurring events, consider creating individual event times for each session if different communications are needed.
- Alternatively, use the More Options in the Attendee Communication area to target specific dates and times.
- This approach avoids sending multiple or conflicting reminders and ensures each session receives the correct communication.
Handling Zoom Link Details for Multi-Session Events
- For events involving multiple sessions or Zoom links, ensure that the correct link is sent to attendees.
- Use custom fields or include the Zoom link directly in the event description so that the correct session details are included in the email templates.
- If a Zoom link needs to be updated post-scheduling, resend the event communication using a manual email blast through the event’s Attendee Communication section.
Contact Event Organizer Email – Clarification
- The Contact Event Organizer email is managed within Settings > Store.
- This email not only goes to the site owner but can also be customized according to your needs at the store level.
- When customizing, ensure that changes are saved correctly and note that this setting applies site-wide.
Accessing Email Template Editor
Learn how to customize your reminder email templates.
Abandoned Cart Recovery Emails
SimpleTix automatically sends recovery emails to customers who abandon checkout.