> ## Documentation Index
> Fetch the complete documentation index at: https://help.simpletix.com/llms.txt
> Use this file to discover all available pages before exploring further.
# Managing and Viewing Admission Details
> Learn how to manage attendee admissions, view ticket statuses, and export attendance data using Manager Portal.
# How to Manage and View Admission Details on the web
## 1. Accessing Attendee Management
* Log in to [Manager Portal](https://manager.simpletix.com).
* Click **Events** on the top rail and select your event.
* In the left-hand rail, click **Attendee List**. You can also copy the URL from your browser's address bar once on the event's management page; this URL contains the unique event identifier, which serves as a direct link.
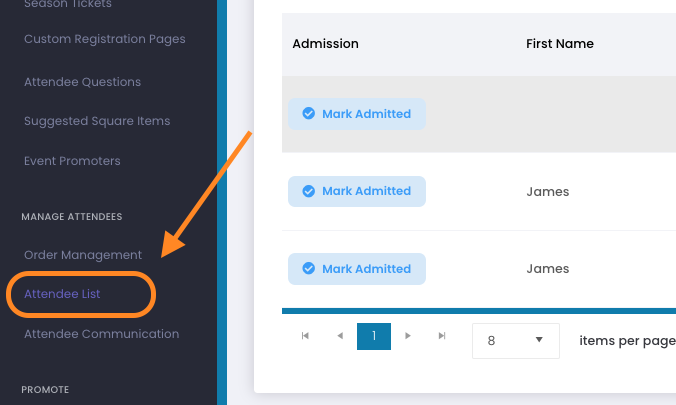 ## 2. Admitting or Unadmitting Individual Tickets
* On the Attendee List page, next to each attendee's name, you'll see a **Mark admitted** button.
* Click this button to admit the ticket – once admitted, the button will turn green and display **Admitted**
* Click the **Admitted** button again to unadmit it if you need to allow the ticket to be scanned again.
## 3. Admitting or Unadmitting All Tickets in an Order
* Click on the **Order ID** to view the details for that order.
* From the order details page, you can:
* Use the **Admit All** option to mark every ticket in that order as admitted.
* *Note:* If the order contains tickets with different dates (such as a multi-day pass or tickets for various performances), using **Admit All** will mark every ticket as admitted regardless of the individual event date. Use this option with caution.
* Toggle the admission status for all tickets if you need to reverse the process. All tickets in the order will have their statuses toggled, so handle bulk actions carefully.
## 4. Viewing Admission Details
* By clicking on an **Order ID**, you can view an order's details.
* The detailed view displays:
* Whether a ticket has been admitted.
* Which scan device was used.
* Date and time of admission.
## 5. Accessing Detailed Admission Reports
* On the Attendee List page, click the **Options** button and select **View Admission Data**.
* The report provides detailed information, including:
* The number of scans per ticket.
* Date, time, and scan device details.
* For a broader data overview, including attendee questions, smartwaiver status, and no-shows, export the attendee list.
## 6. Exporting Attendee Data
* Click **Options** and select **Export List**.
* You can choose to include additional data such as survey questions or order notes.
* Have the report emailed to you or downloaded in the download center. This exported data helps identify attendees who haven't checked in (tickets with blank **Admitted** entries).
SimpleTix now offers the ability to export attendee data from all events at once. To access this feature, click **Reports** on the top rail, select **Downloads**, then click the **Export All Attendees** button on the Sales Report page. Learn more in our [Guide to SimpleTix Reports](/docs/reports/guide-to-simpletix-reports#32-exporting-all-attendees-across-all-events).
## 7. Mailchimp Integration
* If your Mailchimp account is connected, you can export attendee data directly to Mailchimp from the **Options** menu for further marketing or follow-up.
# How to Manage and View Admission Details in the SimpleTix Organizer App
## 1. Accessing Admit Screen
* Select Admit on the top rail of the app (by default the app will open into sell mode)
* Select your event
* Search by Attendee Name, Buyer Name, Order Number, or Last 4 Digits of the Credit Card
## 2. Swipe to the right to admit. Swipe to the left to unadmit
## 3. Click on an attendee to see more info
* You can edit their name, upload a photo, view Attendee Questions and Order Notes, or view the order. Viewing the order will let you see other tickets associated with the order. Clicking Admit Now will admit the tickets
* **Flex Pass:** Clicking on the photo will let you take a picture of the attendee and store it with their ticket
Explore methods to manage group admissions with SimpleTix.
## 2. Admitting or Unadmitting Individual Tickets
* On the Attendee List page, next to each attendee's name, you'll see a **Mark admitted** button.
* Click this button to admit the ticket – once admitted, the button will turn green and display **Admitted**
* Click the **Admitted** button again to unadmit it if you need to allow the ticket to be scanned again.
## 3. Admitting or Unadmitting All Tickets in an Order
* Click on the **Order ID** to view the details for that order.
* From the order details page, you can:
* Use the **Admit All** option to mark every ticket in that order as admitted.
* *Note:* If the order contains tickets with different dates (such as a multi-day pass or tickets for various performances), using **Admit All** will mark every ticket as admitted regardless of the individual event date. Use this option with caution.
* Toggle the admission status for all tickets if you need to reverse the process. All tickets in the order will have their statuses toggled, so handle bulk actions carefully.
## 4. Viewing Admission Details
* By clicking on an **Order ID**, you can view an order's details.
* The detailed view displays:
* Whether a ticket has been admitted.
* Which scan device was used.
* Date and time of admission.
## 5. Accessing Detailed Admission Reports
* On the Attendee List page, click the **Options** button and select **View Admission Data**.
* The report provides detailed information, including:
* The number of scans per ticket.
* Date, time, and scan device details.
* For a broader data overview, including attendee questions, smartwaiver status, and no-shows, export the attendee list.
## 6. Exporting Attendee Data
* Click **Options** and select **Export List**.
* You can choose to include additional data such as survey questions or order notes.
* Have the report emailed to you or downloaded in the download center. This exported data helps identify attendees who haven't checked in (tickets with blank **Admitted** entries).
SimpleTix now offers the ability to export attendee data from all events at once. To access this feature, click **Reports** on the top rail, select **Downloads**, then click the **Export All Attendees** button on the Sales Report page. Learn more in our [Guide to SimpleTix Reports](/docs/reports/guide-to-simpletix-reports#32-exporting-all-attendees-across-all-events).
## 7. Mailchimp Integration
* If your Mailchimp account is connected, you can export attendee data directly to Mailchimp from the **Options** menu for further marketing or follow-up.
# How to Manage and View Admission Details in the SimpleTix Organizer App
## 1. Accessing Admit Screen
* Select Admit on the top rail of the app (by default the app will open into sell mode)
* Select your event
* Search by Attendee Name, Buyer Name, Order Number, or Last 4 Digits of the Credit Card
## 2. Swipe to the right to admit. Swipe to the left to unadmit
## 3. Click on an attendee to see more info
* You can edit their name, upload a photo, view Attendee Questions and Order Notes, or view the order. Viewing the order will let you see other tickets associated with the order. Clicking Admit Now will admit the tickets
* **Flex Pass:** Clicking on the photo will let you take a picture of the attendee and store it with their ticket
Explore methods to manage group admissions with SimpleTix.